
The crash pad you select will impact your safety every time you are bouldering outdoors. John Sherman in his book Better Bouldering puts it succinctly: “There’s no sense in becoming an Advil poster child.” A crash pad is the most expensive purchase in bouldering, but this is not an item to select by price alone.
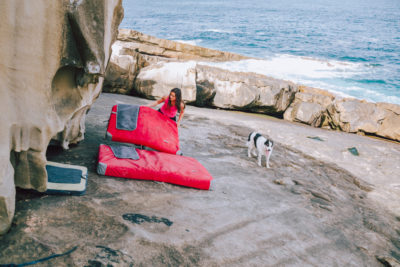
The crash pad should be sized for the heights you will be sending. Larger pads are essential for higher problems. Hinge pads are great for level landings, and taco pads fit well over outcroppings and uneven ground. Hybrid pads provide a good compromise to hinge and taco design drawbacks. The crash pad should be at least 4 inches (10 cm) thick. If standing on a pad bottoms it out, the foam is not dense enough. Make sure the shoulder straps and waist belt are a good fit.
Basic Types of Crash Pads: Taco, Hinge, and Hybrid
The two basic types of crash pads are hinge and taco, and each has distinct advantages and disadvantages to consider.
Hinge Pads
With a hinge design, the two pads fold together like the two sides of a suitcase: the pad is composed of two individual foam pads joined together by a cloth hinge.
Advantages of hinge pads:
- The compact size of a folded hinge pad is convenient for transport and storage
- Hinge pads are great for level ground because they open up very flat
- Since they fold up neatly, these pads are easier to carry on approaches
Disadvantages of hinge pads:
- The central crease is problematic
- These pads don’t conform to rocky outcroppings and craggy ground
- Because they fold up tightly, these pads hold less gear on approaches
Be aware of risks associated with the hinge pad’s central crease where the two foams abut together. Rocks, outcroppings, and even personal items like water bottles, can thrust up into the crease, hidden from view by the cloth hinge. This can cause serious injury in a fall.
Therefore, when using a hinge pad it is extremely important to cinch the hinge firmly shut with the straps or flaps provided. The pad should have a full central flap to cover the crease, rather than Velcro strips. Velcro strips will pull apart under the force of a fall. Another option is straps, which are easier to use than Velcro and will fasten securely.
Some hinge pads have an angled hinge. The slanted central crease makes it less likely that rocks, branches and other sharp objects will insert.
Since hinge pads shut tightly when folded, they hold less gear than taco pads, but are easier to carry.
Taco Pads
Taco pads have no central hinge, and the whole pad simply folds in half.
Advantages of taco pads:
- There is no central seam to worry about
- When unfolded, these pads don’t lay flat and can be used to conform to rocky outcroppings and uneven ground
- Most taco pads will hold more gear than hinge pads – very convenient on approaches
Disadvantages of taco pads:
- Because taco pads don’t sit flat, they are less optimal on level landing areas
- With repeated folding, the foam in the central area becomes compressed
- Taco pads are bulkier than hinge pads to store and transport
- Since a taco pad does not fold evenly, its weight will be lopsided to carry
The advantage is that there is no central seam to worry about, but with time the fold area will become compressed and thinner than the rest of the pad. Storing the taco pad in an open position will help slow this process down. Placing a sub pad over the thin area will extend the useful life of the taco pad.
Folded taco pads are more bulky than hinge pads. An obvious but important question to ask is whether the folded pad will fit in your vehicle.
Hybrid Hinge Pads
Hybrid pads are hinge pads with a thin, closed-cell foam layer that covers the entire top of the pad. Objects on the ground can still insert themselves into the seam, but the dense top layer of foam will provide some protection.
The top layer still allows the pad to be folded like a suitcase along the hinge, and removes the need to secure the central seam shut with straps or flaps when the pad is in use.
Foam Quality and Density
Some brands have softer foam than others. If simply standing on a pad with both feet compresses it completely (“bottoming out”), the pad is not dense enough.
Erring on the side of more firmness means that the pad will eventually become more comfortable with use, while a pad that starts out comfortably soft can bottom out after a breaking in period.
Foam quality varies greatly between brands. A moist-feeling foam will be longer-lasting due to its higher latex content (1). Inexpensive pads may be a poor investment because the foam will break down fast.
Some companies sell replacement foam, a nice option for extending the life of a pad with a good quality cover.
The Two Sides of a Crash Pad
Crash pads come with a thin, high compression side and a thick, low-compression side.
The thin top layer of high-quality, closed-cell foam distributes the weight on impact. This thinner, high density side – it’s usually the side with the company’s logo – is firm and spreads impact over a greater area, making for a safer landing. Therefore, on higher climbs, make sure the pad is placed with this high-density side facing up.
The thick, open cell foam layer absorbs the energy of the impact. This low-density side is normally placed on the bottom because it conforms to unevenness of the ground beneath. For shorter problems, however, this more yielding foam can be used on top to provide a softer landing.
The thick, low-compression side may also have a firm bottom layer of closed cell foam to protect against bottoming out, and also as extra protection from rocks (although sharp rocks should still be moved out of the way).
Pads come with either configuration – firm top or soft top – but whichever you buy can usually be flipped over to the density most appropriate for the height of your current problem.
Foam Thickness: Thicker Is Not Necessarily Safer
Manufacturers can use extra thickness as compensation for poor quality foam, and the extra thickness can cause a twisted ankle if the fall is angled.
Four inches (about 10 cm) is a good thickness to look for in a regular crash pad. Three inches (7.6 cm) is only thick enough for a backup sub pad. It is not thick enough to be safe as your main, stand-alone landing surface.
Large and extra-large pads can be 5 inches (12.7 cm) thick or more.
On very uneven ground, a thicker pad is a good choice but this is offset by the heavier weight on approach.
Which Crash Pad Size to Get?
You want as large a pad as you can carry and afford. Pads can be sized as regular, full, and oversized, and sizing varies a lot between different brands.
Regular crash pads, on average, are 3 by 4 feet (91.4 x 121.9 cm), four inches (10.2 cm) thick, and are intended for shorter problems.
Large pads, needed for higher problems, are about 4 by 5 feet (121.9 cm x 152.4 cm), and can be 4 to 5 inches (10.2 to 12.7 cm) thick.
Extra-large or oversize pads provide more confidence on very high problems.
Exterior Materials
You want a pad with a heavy-duty exterior. Make sure that the material is tough, thick and looks durable against abrasion. Check for strong, double-stitched seams.
Is the pad’s surface easy to wipe clean? After a long exhausting day outside, this will make for faster cleanup before putting the pad back in the vehicle.
Crash pads with a rubberized base stay put better on uneven or sloping ground. Pads without the traction of a rubber coating tend to slide and shift.
Does the crash pad have an integrated shoe cleaning surface or carpet mat? Even if the crash pad has an integrated section of carpet, you may still want to bring a separate piece of carpet. A crash pad is usually placed several feet away from the rock face, and you will need something to wipe your shoes on at the very base of the climb.
Check the pad’s closure straps for ease of use: is the pad a joy to fold and secure? If the attachments are difficult and inconvenient to use, this can discourage you from using the pad as often as you should. Buckles tend to be faster and easier to use than Velcro.
Does the pad have side handles for easy shifting from boulder to boulder?
Does the crash pad comes with pockets? Make sure to empty them before using the pad, to keep yourself, your cellphone, and your sunglasses safe.
Carrying the Crash Pad
Here are some things to consider, especially for long approaches.
How high does the pack ride on your back? Packs that sit high are fine for open fields and desert country, but a low-slung pack is best for forested approaches to avoid snagging on branches.
How heavy is the crash pad? Keep in mind that you will be stuffing it with drinks, shoes, chalk, food, and helmet. The final weight of the pad has to be manageable on long approaches.
Will the pad keep your shoes and drinks from falling out? Some newer pads have a zipper that secures the pad’s contents. If there is no zipper, does the folded pad have flaps that will keep items secure?
Is there a waist belt? This can make a huge difference on long approaches by putting the load on the hips and keeping the shoulders fresh for the climb.
Are the shoulder straps curved, comfortable, and padded for long hauls? The shoulder straps and waist belt should be adjustable to your size. If you have bouldering buddies of various sizes, can the shoulder straps be adjusted for long and short torsos?
It’s great if the shoulder straps and waist belt are removable, but if not, there should be a flap to protect them from dirt and damage. Is the strap cover made of strong, abrasion-resistant material? Some pads have a strap cover that also doubles as a shoe wipe surface.
Are there load adjustments straps to keep the pad from pulling away from your back? With lop-sided taco pads, or especially with the larger, heavier pads, this can make or break a long approach.
Sub Pads
These are thin, high-density pads that are small enough to slide into most folded hinged and taco pads.
Sub pads, also called slider, supplemental, or briefcase pads, are usually about 1/3 the weight of regular pads. Size varies, but two by three feet (61 by 91.4 cm) seems to be the norm, although some are larger. They can be one to three inches thick (2.5 to 7.6 cm).
Sub pads are very useful for covering the junctions in multi-pad landings, for extra padding where the landing area is uneven, and to cover rocky outcroppings that are close to the landing area.
They are also great for very low problems, offering an off-the-ground surface for sit-down starts, and for covering the thinning central area of taco pads.
Being so small and thin, these pads do not offer enough protection to be used alone as landing pads except for extremely low problems.
Related Questions
Are there any special considerations when planning on using more than one pad?
- To make life easier, select a brand whose pads have a built-in flap for carrying a second pad.
- Get pads with square corners. Pads with rounded corners are a poor choice because there will be a dangerous gap where the rounded corners come together. Murphy’s Law dictates that a falling climber will always land where the pads fail to meet.
- Try to get pads from the same company, and make sure they have velcro or strap attachments to secure the pads together. Trying to attach pads from different brands can be as problematic as herding cats.
References
- John Sherman, Better Bouldering 3rd Edition