
Just getting started with bouldering, and feeling overwhelmed with chalk choices? You’ve read a hundred Amazon reviews, and now your head feels full of chalk dust? Let’s sweep off the dust and get your chalk situation sorted out.
The right chalk for your first indoor bouldering session should be easy to use and a safe bet for most gyms. Bouldering gyms tend to encourage the use of a chalk sock to keep clouds of dust from clogging their air filters. However, it can be difficult to squeeze chalk from a chalk sock, and you don’t want to be struggling with this on your first try at bouldering. So the best compromise is to have a handful of loose chalk in the bottom of your chalk bag, with a chalk sock sitting on top to contain the dust and prevent spills.
The loose chalk that you place in the bottom of your chalk bag could come from the chalk sock itself, if you purchase a refillable sock. Or you can buy the loose chalk separately.
Most bouldering gyms will rent chalk bags. This is useful for postponing your first purchase until you have some experience with what a good grip feels like. However, maybe you fancy having your own gear from the get-go. Or perhaps, like me, you balk at the thought of spending money on rentals that could instead be applied towards a purchase.
If so, what you need at this point is a quick decision on a chalk that will work well to get you started.
Let’s look at some options.
No Loose Chalk Allowed? Go for a Chalk Sock
If your gym has a no-loose-chalk policy, going with a sock is a great option. (But if your top concern is to keep chalk dust out of your lungs, see the liquid chalk section below.)
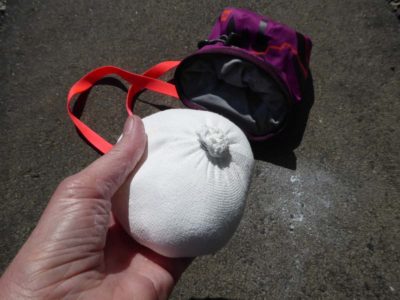
A chalk sock is simply a small bag, usually made of cotton, which is filled with chalk. To use it, squeeze the sock, roll it in your hand, or slap it against your palms to release a film of chalk.
The most common complaint with chalk socks is how difficult it can be to get enough chalk on one’s hands. The chalk layer will almost always be on the thin side, which means you may need to apply more frequently. Here are some ways to get around this problem:
- Keep a handful of loose chalk in the bottom of your chalk bag, with your sock on top. This lets you quickly access more chalk while keeping you compliant with your gym’s guidelines
- Roll your sock in loose chalk to give the material a thicker coating for easier application mid-climb
- If you have a refillable sock, pour out a bit of its chalk to soften the sock and give it more pliability
- When refilling a sock, be sure to use a chalk texture that has few or no chunks
- It takes a while to break in a new sock, so spend a few minutes kneading it with some good strong squeezes
- Bounce the sock a few times against your thighs: halfway through the problem, rub your hands on your pants to quickly chalk up
However, if you find that your sock is giving you a decent coating, that should be enough. Instead of increasing the grip, too much chalk on the hands will act as a lubricant, causing slipping.
Different brands have different quality and ease of use: some companies make socks that are better than others at releasing the chalk, others have refillable socks that are easier to refill. Chalk socks usually hold between 2 to 3 ounces (about 56 to 85 grams). One sock should last several months to half a year, depending on how often you climb.
The Cheapest of the Cheap: The Chalk Block
If price is your main consideration, a chalk block is easily the most budget-friendly option. Starting at just under $4.00 for 2 ounces (4.54 grams), most chalk blocks will have you covered for months if not a year or more.
- If your gym does not insist on chalk socks, chalk blocks are a very inexpensive option
- Keep the chalk block whole in your chalk bag, or broken into just a few chunks, to help minimize dust clouds
- Keeping the chalk block whole will also prevent a mess if your bag gets tipped over
- To use, pinch a bit of chalk off the block before you start climbing, and crush it as needed
- If you decide to go with a chalk sock, chalk from your block can be powdered to use under the sock
A chalk block gives you options: you can crush it to a powder, break it into chunks, or leave it whole. If you will be leaving it whole, buy a size of block that will fit in your chalk bag. Best practice, especially in bouldering gyms, is to keep the block as whole as possible for as long as possible to keep chalk dust down.
The cheaper brands don’t always stick to your hands as well. For a good performance-to-cost ratio, consider the mid-price blocks.
Feeling Creative? Make Your Own Chalk Sock
You can also use your chalk block to make your own sock: break up the chalk to a powder, pour it into an ankle-length hosiery (pantyhose) sock, and tie up the end.
- The mesh openings in the hose work very well at releasing the chalk
- To make refilling easier, use a small elastic band to close it up
- You can also purchase loose chalk to fill your home-made sock
Messiest but Easiest to Use: The Old Standby, Loose Chalk
When it comes to simplicity and ease of use, loose chalk wins hands-down. Chalking up will be faster and easier than either a chalk sock or block, so if your hands sweat a lot, loose chalk may be the best option for you. Check with your gym to see if they allow it.
Loose chalk comes in a range of textures, from cloudy puffs of powder to large chunks nestled in a loose foundation. There is no special advantage to any specific texture. It all depends on what you like to feel when you dip your hands into your chalk bag: do you like to sink your hands into a soft puff of chalk, or do you prefer rubbing a chunk between your palms and fingers?
Like chalk balls, loose climbing chalk can be pure magnesium carbonate, or it can contain fillers and drying agents. Pure magnesium carbonate chalk is easier on the hands: if your skin tends to split and crack, it’s a good idea to avoid brands with drying agents. However, if your hands sweat a lot, the drying agents may be your salvation.
Use Liquid Chalk for Zero Dust
There are a lot of online recommendations about using chalk socks to keep dust levels down, but liquid chalk is the only option – short of not using chalk at all – which has been tested as significantly reducing chalk dust in climbing gyms (1).
If you suffer from asthma or allergies, or simply want to avoid inhaling chalk dust, liquid chalk is the way to go. To use, squeeze a coin-sized amount or more onto your palm and rub your hands together to get a good coating. Make sure you cover to the ends of your fingertips, and wait until the coating is white and completely dry.
Because of its alcohol content, liquid chalk can be useful if your hands sweat a lot. Apply a base coat before dusting your hands with regular chalk.
There are some downsides to liquid chalk:
- It is made with alcohol, so with repeated use you may have problems with skin splitting and cracking
- Drying time is 10 to 30 seconds. If you’re eager to start your climb, the wait will try your patience (I start feeling antsy at about three seconds)
- If you start climbing before it is completely dry, the chalk will rub off easily and you will have to chalk up again
- It is the most expensive option: even with a good brand that will get you through a full problem with one application, a one ounce bottle may last 1 – 2 months, while chalk blocks for the same price will get you through a year or more
Some climbers do use liquid chalk exclusively, in spite of the cost, because it lasts longer on the hands than loose chalk. The convenience of not having to re-chalk halfway through a bouldering problem might be enough to sway your decision towards trying it. Check reviews before buying: some brands need to be reapplied much more frequently than others.
Liquid chalk comes in tubes or bottles, some of which can be conveniently clipped to a belt. Smaller sizes cost significantly more per volume (sometimes almost twice as much), so it makes sense to go for the larger options, for example 8 ounces (236 mL), once you have found a brand you like.
If you decide to make your own liquid chalk, make sure you use a pure calcium carbonate chalk with no additives. When alcohol is applied to the skin it enhances absorption, so any additives in your chalk will cross over and enter your bloodstream (2). Keep in mind that even pure calcium carbonate can contain contaminants like lead, so source your chalk carefully.
To avoid skin problems, with all chalk options: always wash the climbing chalk off your hands as soon as you’ve finished bouldering. It’s also a good idea to follow up with a hand moisturizer.
Conclusion
Given how many choices are available, choosing your first chalk can feel a bit daunting, but in the end it’s best to get it over and just pick one: regardless of your first choice, you will develop and refine your chalk preferences as you gain experience. So jump in, chalk up, and start the journey.
References
- Weinbruch S1, Dirsch T, Kandler K, Ebert M, Heimburger G, Hohenwarter F. “Reducing dust exposure in indoor climbing gyms.” https://www.ncbi.nlm.nih.gov/pubmed/22767051 July, 2012
- Dirk W Lachenmeier. “Safety evaluation of topical applications of ethanol on the skin and inside the oral cavity” https://www.ncbi.nlm.nih.gov/pmc/articles/PMC2596158/ November, 2008